Best laid plans and all that...
I had significant plans for section walking portions of the Te Araroa over Summer, unfortunately reality made those plans void. In December my family and I found out my mother had terminal cancer. Obviously, I wasn't doing any tramping as she and my father needed my support. She passed away in early February.
I then injured my foot which meant I could not tramp for the rest of February and all of March.
 |
| Mid reaches of the Travers Valley, Nelson Lakes NP |
In early April I figured I would go out for a couple of days tramping. My first thought was a St Arnaud to Boyle River section hike. As my pack fitness was low due to a lack of trips I decided on a shorter exploration of the Travers Valley instead. This is the first part of the Waiau Pass Track, I will be walking the rest of the section through to Boyle River later this year.
 |
| The 'Silver Surfer' (third from left) parked in St Arnaud |
I headed up to St Arnaud early on a Thursday morning, with an end goal of reaching Hopeless Hut by the end of the day. Unfortunately the extremely slow trip from Christchurch to St Arnaud (6 hours) due to roadworks meant I was too late to get that far up valley.
Day One: St Arnaud to Lakehead Hut, Nelson Lakes NP
As I was saying, I started tramping around 12 noon, instead of the 10 am I was expecting. This meant I only got as far as Lakehead Hut, rather than my original goal of Hopeless Hut another 3 hours up valley.
 |
| Day One: St Arnaud to Lakehead Hut |
As always I started out at the Kerr Bay track head, and followed Lakehead Track
(12 km's, 2-2.5 hours) up the eastern side of the lake. This is the second time I have walked this track in the last 6 months (fifth time overall) so it is becoming familiar to me.
 |
| Kerr Bay Jetty, Nelson Lakes NP- overcast and late! |
 |
| Start of the Lakehead Track, Nelson Lakes NP |
 |
| Lakehead Track- That seems familiar.... |
 |
| Jon on Lakehead Track, Nelson Lakes NP |
 |
| Lower Lakehead Track in Nelson Lakes NP |
 |
| A cloud covered Robert Ridge, Nelson Lakes NP |
The weather was overcast but warm, probably about 20 degrees and very calm. Makes a change from the rain and wind I experienced when I walked this part of the track in October 2016.
 |
| Looking back over Lake Rotoiti to St Arnaud |
 |
| Coldwater Hut on the other side of Lake Rotoiti |
Here is what Coldwater Hut looks like, this is taken from the jetty right outside the hut...
 |
| Coldwater Hut, Lake Rotoiti, Nelson Lakes NP |
 |
| Interior view of Coldwater Hut- Lake Rotoiti, Nelson Lakes NP |
Having walked this track before it was a swift and unsurprising trip. I reached Lakehead Hut at about 2.30 pm after a pleasant trip of 2.5 hours. The track was much nicer to walk on as it was dry, I wasn't walking in pools of water like you do when it is raining.
 |
| It's actually about 2 hours to St Arnaud |
 |
| Travers River mouth in the distance, Lake Rotoiti |
 |
| The Lakehead Hut jetty, Lake Rotoiti |
I got to the hut at 2.30 pm for a late lunch of soup and wraps. I thought about continuing up valley but as I knew it was a least 3 hours to Hopeless Hut I decided to stay at Lakehead Hut instead.
 |
| Looking up valley from Lakehead Hut, early afternoon |
 |
| View down valley from Lakehead Hut |
 |
| My direction of travel for tomorrow...up the Travers Valley! |
I shared the hut that night with a French guy heading to Upper Travers Hut and a German couple who were on their way out to St Arnaud in the morning. It was a pleasant night discussing this and that and I turned in early at 8.30 pm as we had no candles so reading was out of the question.
 |
| Late afternoon fog in the Travers Valley |
Day Two: Lakehead Hut to Cupola hut via John Tait Hut, Nelson Lakes NP
On day two I was tramping from Lakehead Hut to John Tait Hut (15 km's, 4-5 hours) up the Travers valley. From there I would be walking another (6 km's, 2.5 hours) to get to Cupola Hut which was my destination for the night.
 |
| Day Two: Lakehead Hut to the Travers Swingbridge |
I was up at the crack of dawn and set off up valley just as the sun was cresting the eastern peaks along the Travers. The first hour or so was an easy walk over grass flats to the swing-bridge over the Travers River.
 |
| Starting out from Lakehead Hut, Travers Valley, Nelson Lakes NP |
The Travers River used to run down the eastern side of this valley, but re routed itself during a big storm back in 2010. If there is a lot of rain then the river will still use the old bed as well as inundating the flats between the two braids of the river. Be aware of this if you are planning on camping up this valley...
 |
| The old Travers River bed 25 mins up valley from Lake Rotoiti |
 |
| Flood debris over 200 metres from the Travers River.... |
 |
| Matagouri and long grass- Travers River Valley |
 |
| The old course of the Travers River, Nelson Lakes NP |
Once across the flats there is a short 20 minute section of forest and bush to pass through before reaching the Travers swing bridge. There are several places along here where the river has eaten the track away and you need to navigate past them.
 |
| A short forest section heading up to Travers River swing-bridge |
 |
| O.K......weird stuff on the Travers Valley Track! |
 |
| The Travers River has eaten the track.....Nelson Lakes NP |
 |
| Last bush finger before swing bridge, Travers Valley Track |
 |
| Old cairn on the Travers Valley Track |
If you are doing the Lake Rotoiti circuit and are unable to use the lower ford this is the bridge you need to cross to get to the true left of the Travers River.
 |
| Travers River swing bridge, Travers Valley, Nelson Lakes NP |
From the swing-bridge it is about 40 minutes to Hopeless Creek, it is then another 2-2.5 hours to John Tait Hut closer to the head of the valley.
 |
| Hopeless Creek to John Tait Hut |
The track between the swing-bridge and John Tait hut is very nice. The track is a mixture of bush, river flats and small up and down climbs over the tail end of the ridges.
 |
| Travers Valley: heading up valley from the Travers swing-bridge |
 |
| Travers Valley: Eroding river bank you need to negotiate |
 |
| Approaching Hopeless Creek on the Travers Valley Track |
 |
| Jon on the Travers Valley Track day two |
 |
| Travers Track- nice easy tramping in Nelson Lakes NP |
 |
| Mt Travers in the distance from the Travers Valley Track, Nelson Lakes NP |
 |
| Climbing up to Hopeless Creek Track, Nelson Lakes NP |
 |
| Foot bridge over Hopeless Creek |
Hopeless Creek has a hut an hour and a half up this side valley. It is a small 6 bunk ex NZFS hut off the TA, it is most commonly used by climbers accessing the surrounding peaks.There is a possible campsite just past the Hopeless Creek turnoff, it is just off the track.
 |
| Travers Valley: the track junction for Hopeless Hut... |
 |
| A possible camp site just past Hopeless Creek, Travers Valley |
 |
| Travers Valley narrows as you climb higher |
This fantail below followed me for about 30 minutes as I walked up the Travers Valley.
 |
| New Zealand Fantail... |
 |
| A Fantail...shakin' that ass...! |
There are a number of very nice looking camping sites up the Travers Valley, none of them are official but it is perfectly legal to camp provided you are not right on top of the track.
 |
| Nice camping spot 2.5 hours up from Travers Swing bridge |
 |
| Travers Valley: possible camping spots an hour from John Tait Hut |
 |
| Travers Valley: Camping spots and small tarn next to the Travers Valley Track |
 |
| Travers Valley Track alongside Travers River |
 |
| It is a nice wide track up the Travers Valley, Nelson Lakes NP |
You strike a foot bridge and attractive cascading stream about 30 minutes from John Tait Hut.
 |
| Bridge about 30 minutes from John Tait Hut |
 |
| Nice cascade 30 minutes from John Tait Hut, Nelson Lakes NP |
 |
| First view of John Tait Hut through the forest... |
The Upper Travers Valley is notorious for avalanches in the winter/spring, hence all the warning signs. Both John Tait, Upper Travers and Cupola Hut's all sit on or near avalanche paths so can potentially get hit at any time from May through December.
 |
| Avalanche warning sign on the Travers Track |
I finally arrived at John Tait Hut after 4.5 hours of trekking. This is an awesome hut, 28 bunks and is in excellent condition given it is over 40 years old. It was recently re painted and some maintenance has been done on it from the look of it.
This is the second John Tait Hut the original from the 1940's was replaced with the current hut in the late 1960's.
 |
| John Tait Hut II |
 |
| Eating area at John Tait Hut |
 |
| Cooking space in John Tait Hut |
 |
| The bunk area- John Tait Hut |
I stopped at the hut for about 40 minutes as I rested and ate my lunch, much better than being eaten alive by the sand-flies sitting on the side of the track somewhere.
 |
| Jon still feeling o.k at John Tait |
 |
| Trampers Lunch: Wraps, pate, soup and tea- I have a big climb ahead! |
 |
| View down Travers Valley from the verandah at John Tait Hut |
As you can see from the photo below the avalanche path is literally 5 metres from the hut. That slide is made of decades if not centuries of avalanche material coming down. There is a photo inside of both the clearing AND the hut totally covered by an avalanche back in 2008. Not a place to be if there are heavy snow storms in the upper valley.
 |
| Avalanche fan & avalanche debris piled up near John Tait Hut |
 |
| Some information about John Tait and the first hut |
 |
| Look at all that lovely wood....! |
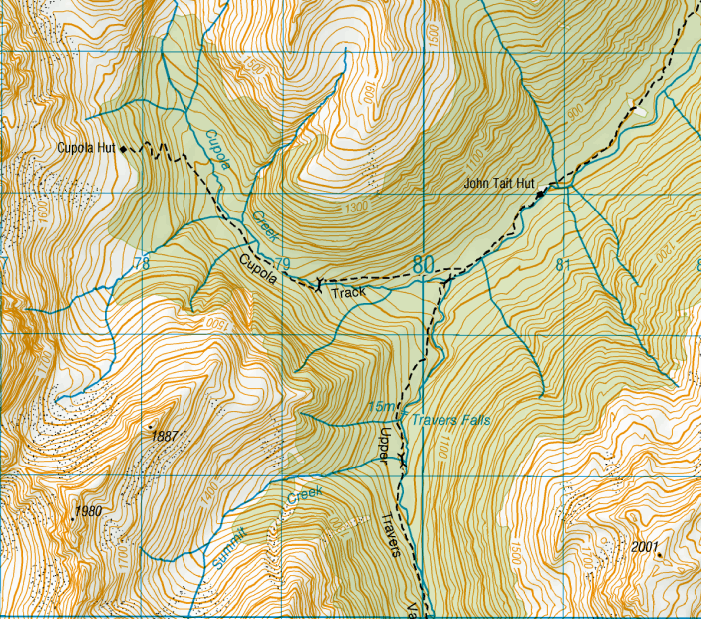
After lunch I refilled my water bottles and set out for my destination for the night, Cupola Hut. Cupola Hut is about 3 hours up valley, there is a side track about 30 minutes from the hut, it is then 2-2.5 hours to the hut.
 |
| John Tait Hut to Cupola Hut |
The time to both Upper Travers Hut and Cupola Hut is around three hours- the distance to both is 6 km. Slow, slow travel, yes...it is steep in places!
 |
| Heading for Cupola Hut after lunch |
 |
| The Travers Valley track starts off flat-ish after John Tait... |
 |
| ...then gets steeper! |
I was staying at Cupola Hut that night, it is another ex NZFS hut off the main TA route, but has been on my hut bagging list for a while.
 |
| The turn off to Cupola Hut, from the Upper Travers Valley track |
After turning off the main Upper Travers Track you start a gradual climb
up to the head of Cupola Creek. You are on the true right to start but
cross over another foot bridge about an hour up the side valley and stay
on that side all the way to the hut.
 |
| Starting up Cupola Creek Track |
 |
| Cupola Creek is your companion for awhile |
 |
| Crossing the bridge mid way to Cupola Hut |
The last section of the track is a switch back, it takes longer to cover
the distance but it sure is a lot less painful way to do so.
It wont be
the original track: back in the old NZFS days they just went straight
up ridge lines, none of this fancy back and forth switch-back stuff...
...because they were HARD!
 |
| Start of the switch back climb to Cupola Hut |
 |
| Nearly at Cupola Hut |
I arrived at Cupola Hut around 4 pm. The view from Cupola Hut isn't
magnificent, there are too many trees in the way for that. It is in a
nice location though, perched high up on a ledge on the mountain side.
The hut is a modified NZFS70 6 bunk hut from the 1960's.
 |
| View from Cupola Hut- not much of a view! |
I was surprised because the hut has a water tank, the DOC website says
there is no water source. Also bloody irritated as I had lugged 3.5 litres of
HEAVY water up the track as I was expecting a dry hut
 |
| End of Cupola Track, Cupola Hut flat |
The hut is classic NZ Forestry Service goodness: it has 6 bunks, an open
fire, a small table and bench seats, cooking bench and a selection of
FMC and hunting magazines. It is mostly used by hunters and climbing parties
attempting the local peaks.
 |
| View of the outside of Cupola Hut |
I had the hut to myself that night which was nice as every other night I
was sharing a hut. Just as well as I was knackered- 8 hours on track
doesn't sound like much to a young bugger but I'm a semi fit 49 year
old. I lay down for a 'short rest' when I arrived and didn't wake up until 7
pm....
 |
| Potential avalanche source above Cupola Hut |
Cupola Hut is also on an avalanche pathway, in this case high steep
cliffs above the hut sometimes release snow after large storms. There
are signs on the track warning of the avalanche danger.
Day Three: Cupola Hut to Travers Falls, then back to John Tait Hut, Nelson Lakes NP
Day three was a short trip back down to John Tait Hut (7 km's, 2.5
hours) for the night, as an added bonus and because it was only 30
minutes away I went up valley to visit Travers Falls. The first hour and
a half was back out to the main Travers Valley track, then right turn
and marche.
 |
| Cupola Hut to John Tait |
Once on the main Upper Travers Track it is a steep climb uphill to the
Travers Falls turn off about a kilometre away. The track follows
alongside the Travers River with the occasional climb to avoid
gorges.You are just able to make out Mt Travers as you climb the track.
 |
| View of Mt Travers through the trees on the Upper Travers Valley Track |
 |
| Bridge over Cupola Creek, main Upper Travers Track |
 |
| Cupola Creek: Deep gorge down there! |
 |
| Travers River from the Upper Travers Valley track |
Below is a classic form of track marking, the top of a can has been cut
off and nailed to a tree. In the old days the Forestry Service used old
paint tin lids and later strips of Permolat which was a reflective strip
much like a metal Venetian blind. The ubiquitous orange triangle only
came in with the birth of DOC in the late 1980's.
 |
| Old style NZFS paint lid track marker.... |
 |
| The Upper Travers Valley track is steep, rocky... |
 |
| ...and covered with roots! |
 |
| A high Alpine mire or swamp near Travers Falls |
 |
| Heading down to Travers Falls from the Upper Travers Valley Track |
Travers Falls is only 15 meters high but the volume of water passing
over it still makes it worth a visit. It was really loud as it is in a
water carved amphitheatre, be careful of the track/ viewing area as it
is steep and wet from the spray. I recommend you go have a look if you are passing this
way.
 |
| Travers Falls from the viewing track |
I continued on up the track for another 15 minutes to see what I could
see, I turned back at the first stream/avalanche path as the bridge that
used to cross the stream has been washed away.
 |
| Upper Travers Hut is 2 hours that way.... |
Then it was back
tracking to John Tait Hut for the night, and a return to St Arnaud several days later. I will be back to finish this section of the TA in late 2016, watch this space...