Holy blazes.... fire starting, a vital outdoor skill!
The
ability to build and light a fire when required is still a vital piece
of tramping knowledge. Although the use of the fire as a cooking method
has waned (with some exceptions discussed below), fires built for heating, drying and survival purposes still
have a place in the outdoors.
 |
| Blazing fire in Lakehead Hut on a cold rainy day |
I have no pretensions as an expert on the subject, what follows are just a few tips I have picked up over the years.
Do I REALLY need a fire?
The very first question you need to ask yourself is 'Do I really need to light a fire'?
Most people will say yes, but actually for much of the year a fire is total overkill. Rather than lighting a fire why don't you put some more clothes on?
Most people will say yes, but actually for much of the year a fire is total overkill. Rather than lighting a fire why don't you put some more clothes on?
If you are sitting in a hut and it is 30 degrees outside it would be madness to start a fire. You may laugh but this has happened to me a couple of times. One blistering hot summer afternoon I arrived at Boyle Flat Hut where two Swiss hikers had the fire going. The hut was hot...like 45 degrees hot! They had all the windows open because it was too damn hot in the hut to sit inside.
 |
| Blazing hot 30 degree day on the St James- not a good day for a fire! |
I suggested politely but firmly that possibly that wasn't an awesome idea...
Again if you are camping and it is raining it would also be mad to start a fire. You are going to find it hard to find dry wood, the rain will dampen your fire and you would be sitting outside getting warm on your front and wet everywhere else. You would be better staying in your sleeping bag in your tent.
 |
| Are we having fun yet? |
You need to carefully pick if and when you are going to light a fire.
When is a fire appropriate?
Good question. Here are some things to consider when deciding if a fire is suitable: |
| Boiling the billy- a classic tramping tradition! |
- How long is your stop? In the old days Kiwi trampers made a fire every time they stopped so they could make a brew, you can still do, this but is it necessary.
- Wood supply: is there any wood available? Often the answer will be no, especially around the well used non serviced huts and above the bush-line.
- Temperature: Do you REALLY need a fire if it is 30 degrees Celsius?
- Is there a fire ban in place? This is a lot more common now with climate change.
- Is a small fire more appropriate than a large one? You may only need a small fire to heat the newer 'insulated to death' DOC huts. Don't go overboard and try to melt the window glass...
Wood selection for fire making
So, you have decided a fire is needed and now you are going to build
one. You will need wood, so what kind works best and how much do you
need.
The
quick answer is any wood that is dry- unfortunately this is often hard
to locate. Look for standing dry wood, or wood which has been kept dry
in a
wood shed (at most DOC huts), under a large bush or over hang.
Do not bother with rotten wood, it will never burn even if it is bone dry. Bark is also difficult to light- keep it for when the fire is really blazing.
 |
| Plenty of standing dry wood there... |
Do not bother with rotten wood, it will never burn even if it is bone dry. Bark is also difficult to light- keep it for when the fire is really blazing.
 |
| Wet, rotten wood will not burn... |
Wood
types that burn well are soft like pine, beech, manuka/kanuka
etc. Native hardwood's such as Rimu, Totara and Matai are hard to light
but will burn for a long time, keep them for when the fire is roaring.
You need three types of fuel for a fire:
Tinder:
Tinder provides the fire-starter for your blaze- it might be paper, dry
grass, dry pine needles, frayed twine, steel wool, birds nests or dry papery tree bark. I like
native Fuschia bark, it is a light paper like bark that will take a
flame well.
 |
| A tinder bundle made of dried grass |
Kindling: Think
finger sized or smaller; sticks, branches or slices cut from a larger log. I usually use a
mixture of sticks and slices. If the sticks have thick bark try to slice
them in half so they catch fire better as bark is notoriously difficult to light.
 |
| Cutting logs into kindling, Lakehead Hut |
Logs/splits:
These will range in size from arm thick to thigh thick depending on the
type of fire. All logs work better if they are split i.e. cut into
several slices. Wood with edges burns better than full round logs due to
the bark. If the fire is in a hut make sure the splits are short enough to fit into the wood burner.
 |
| Some log splits for the fire box |
Tools of the trade
Once
you have your wood sorted you need some tools to break it into
manageable pieces.
Your first tool is yourself, break small branches in your hand, over the knee or around a tree. Slightly larger versions can be leaned against a rock and broken in half with your feet. Breaking wood this way is as old as humanity, we have used this method for the last 100 thousand years.
Your first tool is yourself, break small branches in your hand, over the knee or around a tree. Slightly larger versions can be leaned against a rock and broken in half with your feet. Breaking wood this way is as old as humanity, we have used this method for the last 100 thousand years.
Other
tools you will use are axes, saws and knives. If you are in a DOC hut
there
will probably be either an axe or a saw for firewood preparation. It is
easier to saw any wood into manageable logs and then split them with the
axe- chopping through a log is an exercise in futility!
 |
| Tools of the trade: Axe and saw |
If
you are
camping you will need to make due with what you can find, break by hand
or use whatever
knife you carry. If you are a machete, parang or kukri carrier you are
set...they are all basically small axes. If like me you only carry a
Swiss army knife hand broken wood is your only option.
 |
| The Kukri I carried in the Army- awesome knife but bloody heavy! |
If
you have a suitable knife, grab a piece of hard wood and use it as a
hammer to drive your knife through thinner pieces of wood.
 |
| Using a knife and a log to split wood, photo Paul Kirtley |
Regardless
of the tool always be safety concious- take care using any sharp blade,
don't let minors cut wood, wear boots when chopping and try to get home
without slicing yourself up to badly....
Types of fires
There
are many different formations you can use when you first start a fire,
the most common are the teepee, log cabin and upside down pyramid. All of
these use the same basic premise; a structure is built around and above
the tinder. Once the blaze is going well the larger splits will collapse
forming a good bed of coals for large pieces of wood.
 |
| Some different types of fire formation |
Another
type is the star fire. The star fire formation is a good choice for a
slow burning fire in areas with little wood or where only larger logs are
available.
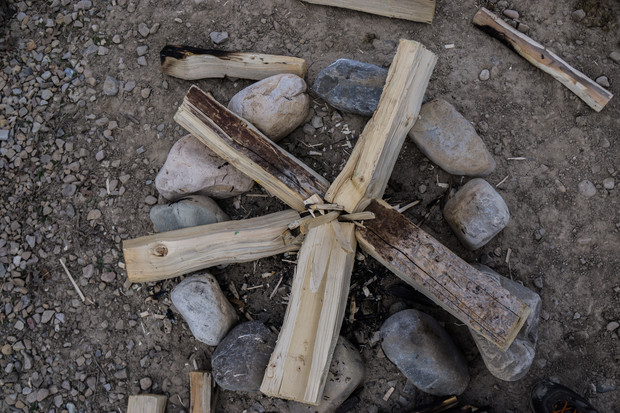 |
| Classic star fire set up |
With a star fire set up, once the fire is burning the various logs are slowly feed
into the centre maintaining the fire.
Building an outdoor fire
The skills used building a fire indoors or outdoors are very similar, you use the same process in both cases.
 |
| A scratch camping spot with fire circle near Mt Richardson, Canterbury |
When building an outdoor fire you need to follow these steps;
- Locate a site for your fire. Using 'leave no trace' methods this should be in an existing fire circle, or on a hard impermeable surface such as rock, compacted sand or compacted soil
- Gather your wood: you need tinder, kindling and fuel wood. Make sure you have enough fuel to maintain the fire until it is going well enough to allow you to find more wood
- Place a bunch of tinder in the middle of your camp-fire site, if the ground is damp construct a wood platform with larger wood raise the fire and stop the tinder from getting wet
- Form an initial teepee of small kindling around your tinder regardless of the form of fire you are building
- Add kindling to the pile, working up to pencil sized pieces
- Create a larger teepee/log cabin/upside down pyramid around and above your kindling teepee using fuel wood,
- Light your fire. If you have some type of fire starter (commercial/rubber inner tube/candle stub/parafin soaked cotton waste) this is when you should use it.
 |
| Different types of firewood ready for use |
 |
| Lighting a classic 'pyramid' fire outdoors |
 |
| A suitably small campfire at the Ryde Falls camp-site, November 2012 |
Make sure that you:
- Conserve wood- only use what you need, when you need it- don't waste wood just because it is there. Leave some for other trampers if you can
- It isn't the size, its how you use it- keep fires small, they use less fuel and usually do the job perfectly adequately.
- Don't use smooth river stones in a fire circle- they may explode as the moisture in them heats up and makes them expand.
- Don't light a fire on humus (the dry, crumbly soil you find on a forest floor) as it can smoulder and eventually catch fire long after you are gone. Also be careful in a tussock field- they can smoulder for days if not weeks!
- Watch your fire, never leave it unattended in case it gets out of control and starts a larger fire.
- Make sure it is fully out before departing: use the douse, crush and mix method. Put the fire out with water/soil/sand then crush the embers with your feet. Mix it around with a stick to make sure all embers are out. Repeat until fully doused.
Building a fire in a hut
Almost
all DOC huts will have a heat source of some sort, generally these will
be open fires, pot belly stoves or wood burners. A few of the Great
Walk huts have gas heaters, usually only during the Summer season.
 |
| The classic 'corker cooker' wood burner, Magdalen Hut |
In
general terms you need the same resources for a hut fire as a camp
fire: tinder, kindling and wood. If you are lucky (for instance I was at
the hut before you) you will arrive to find a supply of all three ready
and waiting. If you are unlucky you will need to gather your own.
 |
| Fire prep done and wood laid in for when needed |
Your
first port of call should be the hut woodshed; most serviced and
standard huts will have one, wither there is any wood in them is a
different matter. If there is no wood shed or it is empty start foraging
in the bush for your wood.
 |
| Partially full wood shed at Nina Hut |
 |
| Look at that beauty: a full wood shed at John Tait Hut |
Construct
your wood burner fire as you would for a camp fire. Use either a tee
pee, pyramid or log cabin. The tinder goes in the centre with small
kindling stacked around and over it. Have a supply of larger pieces of
wood on hand for when the fire takes. Once you have a base of coals in
the fire box you can start to add these larger logs as they need intense
heat to ignite.
 |
| The basic framework for starting a fire |
 |
| Firebox prepared for starting |
 |
| Slightly shambolic stack but it will work! |
Some
huts will also supply coal for the hut fireplace. I'm constantly
surprised by the number of people who have never used coal before, when I
was young everyone used it on their open fires so everyone knew how to
use it.
 |
| A bag of coal in fire wood shed, Lake Daniels Hut |
To
use coal, first build a fire as described with wood. Once you have a
nice bed of hot embers evenly spread a small shovel full of coal over
the top. Take it easy with that shovel though, too much and you will
smother your fire.Watch the coal dust as it can be explosive in the
right conditions.
 |
| Coal being used in an open fireplace |
I
know there are environmental issues with using coal, but it is much
more efficient that burning wood. Coal will give you a long, slow and
even burn and it puts out a lot more heat than wood so if it is
available use it.
Practice makes perfect
It
is really important to
practice your fire construction skills, even if you don't actually light
the fire.
Take the opportunity when you go for a tramp to locate and prepare fire
starting materials. Chop wood at huts, and split some for kindling- you
are practising your skills and making someone else's visit easier.
Keep an eye out for good tinder, I collect peeling Fuschia bark every time I see one of these trees as they make excellent tinder. I have a couple of kilos of it at home waiting to be used.
 |
| In the firebox and ready to go, Mid Robinson Hut |
Keep an eye out for good tinder, I collect peeling Fuschia bark every time I see one of these trees as they make excellent tinder. I have a couple of kilos of it at home waiting to be used.
 |
| Paper like bark of the native Fuschia Tree |
Over the Summer months I always take the opportunity to cut & gather wood when I get to a hut. I cut some kindling and gather dry branches, put these in the woodshed, under the veranda or under the hut if possible so they can dry. I wont need it but I'm providing for leaner times when dry wood is not so easy to locate.
 |
| Best way to stack wood- cross hatch stack- it dries faster |
If you pass a likely looking log close to a hut by all means carry it with you, chop it up and put it in the wood shed, every little bit helps.
Cooking with twig stoves
I occasionally see TA trekkers using stick/twig stoves when I am out and about. They are thin fold away metal designs that use small sticks and twigs as fuel, sort of a mini campfire just for cooking or boiling water. |
| A classic twig fire in use at a campsite |
Their main advantage is light weight: no gas canisters, camp fuel or meths with these. Just the stove and whatever sticks you can find.
Starting a fire in one uses the same methods as a larger fire, they all have their idiosyncrasies so I wont go into any more detail, if you are interested check out this Section Hiker article.
 |
| Twig fire cooking in the snow.... |
Personally, I would find using one more hassle than its worth but those who use them are ardent in their views of their usefulness. Just don't over stuff them with wood like the one below...no water for tea coming from that abomination.
 |
| Too much wood = no damn fire! |
So that's about it folks, I hope that is useful....happy fire making!
No comments:
Post a Comment